The Go Blog
The Go image package
Introduction
The image and image/color
packages define a number of types:
color.Color and color.Model describe colors,
image.Point and image.Rectangle describe basic 2-D geometry,
and image.Image brings the two concepts together to represent a rectangular grid of colors.
A separate article
covers image composition with the image/draw package.
Colors and Color Models
Color is an interface that defines the minimal method set of any type that can be considered a color: one that can be converted to red, green, blue and alpha values. The conversion may be lossy, such as converting from CMYK or YCbCr color spaces.
type Color interface {
    // RGBA returns the alpha-premultiplied red, green, blue and alpha values
    // for the color. Each value ranges within [0, 0xFFFF], but is represented
    // by a uint32 so that multiplying by a blend factor up to 0xFFFF will not
    // overflow.
    RGBA() (r, g, b, a uint32)
}
There are three important subtleties about the return values.
First, the red, green and blue are alpha-premultiplied:
a fully saturated red that is also 25% transparent is represented by RGBA returning a 75% r.
Second, the channels have a 16-bit effective range:
100% red is represented by RGBA returning an r of 65535,
not 255, so that converting from CMYK or YCbCr is not as lossy.
Third, the type returned is uint32, even though the maximum value is 65535,
to guarantee that multiplying two values together won’t overflow.
Such multiplications occur when blending two colors according to an alpha
mask from a third color,
in the style of Porter and Duff’s classic algebra:
dstr, dstg, dstb, dsta := dst.RGBA()
srcr, srcg, srcb, srca := src.RGBA()
_, _, _, m := mask.RGBA()
const M = 1<<16 - 1
// The resultant red value is a blend of dstr and srcr, and ranges in [0, M].
// The calculation for green, blue and alpha is similar.
dstr = (dstr*(M-m) + srcr*m) / M
The last line of that code snippet would have been more complicated if we
worked with non-alpha-premultiplied colors,
which is why Color uses alpha-premultiplied values.
The image/color package also defines a number of concrete types that implement
the Color interface.
For example, RGBA is a struct
that represents the classic “8 bits per channel” color.
type RGBA struct {
    R, G, B, A uint8
}
Note that the R field of an RGBA is an 8-bit alpha-premultiplied color
in the range [0, 255].
RGBA satisfies the Color interface by multiplying that value by 0x101
to generate a 16-bit alpha-premultiplied color in the range [0, 65535].
Similarly, the NRGBA struct
type represents an 8-bit non-alpha-premultiplied color,
as used by the PNG image format.
When manipulating an NRGBA’s fields directly,
the values are non-alpha-premultiplied, but when calling the RGBA method,
the return values are alpha-premultiplied.
A Model is simply something
that can convert Colors to other Colors, possibly lossily.
For example, the GrayModel can convert any Color to a desaturated Gray.
A Palette can convert any Color to one from a limited palette.
type Model interface {
    Convert(c Color) Color
}

type Palette []Color
Points and Rectangles
A Point is an (x,
y) co-ordinate on the integer grid, with axes increasing right and down.
It is neither a pixel nor a grid square. A Point has no intrinsic width,
height or color, but the visualizations below use a small colored square.
type Point struct {
    X, Y int
}

p := image.Point{2, 1}
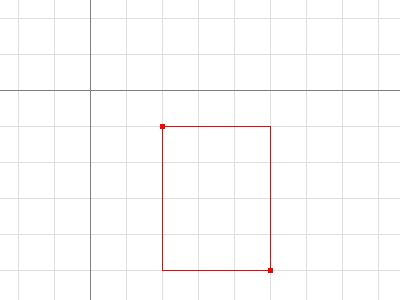
A Rectangle is an axis-aligned
rectangle on the integer grid,
defined by its top-left and bottom-right Point.
A Rectangle also has no intrinsic color,
but the visualizations below outline rectangles with a thin colored line,
and call out their Min and Max Points.
type Rectangle struct {
    Min, Max Point
}
For convenience, image.Rect(x0, y0, x1, y1) is equivalent to image.Rectangle{image.Point{x0, y0}, image.Point{x1, y1}},
but is much easier to type.
A Rectangle is inclusive at the top-left and exclusive at the bottom-right.
For a Point p and a Rectangle r, p.In(r) if and only if r.Min.X <= p.X && p.X < r.Max.X,
and similarly for Y.
This is analogous to how a slice s[i0:i1] is inclusive at the low end
and exclusive at the high end.
(Unlike arrays and slices, a Rectangle often has a non-zero origin.)
r := image.Rect(2, 1, 5, 5)
// Dx and Dy return a rectangle's width and height.
fmt.Println(r.Dx(), r.Dy(), image.Pt(0, 0).In(r)) // prints 3 4 false
Adding a Point to a Rectangle translates the Rectangle.
Points and Rectangles are not restricted to be in the bottom-right quadrant.
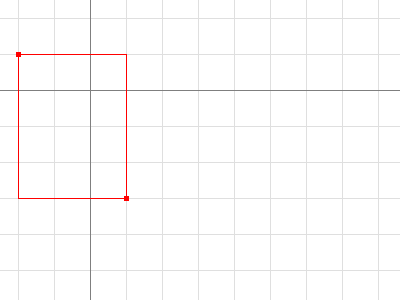
r := image.Rect(2, 1, 5, 5).Add(image.Pt(-4, -2))
fmt.Println(r.Dx(), r.Dy(), image.Pt(0, 0).In(r)) // prints 3 4 true
Intersecting two Rectangles yields another Rectangle, which may be empty.

r := image.Rect(0, 0, 4, 3).Intersect(image.Rect(2, 2, 5, 5))
// Size returns a rectangle's width and height, as a Point.
fmt.Printf("%#v\n", r.Size()) // prints image.Point{X:2, Y:1}
Points and Rectangles are passed and returned by value.
A function that takes a Rectangle argument will be as efficient as a function
that takes two Point arguments,
or four int arguments.
Images
An Image maps every grid square
in a Rectangle to a Color from a Model.
“The pixel at (x, y)” refers to the color of the grid square defined by the points (x,
y), (x+1, y), (x+1, y+1) and (x, y+1).
type Image interface {
    // ColorModel returns the Image's color model.
    ColorModel() color.Model
    // Bounds returns the domain for which At can return non-zero color.
    // The bounds do not necessarily contain the point (0, 0).
    Bounds() Rectangle
    // At returns the color of the pixel at (x, y).
    // At(Bounds().Min.X, Bounds().Min.Y) returns the upper-left pixel of the grid.
    // At(Bounds().Max.X-1, Bounds().Max.Y-1) returns the lower-right one.
    At(x, y int) color.Color
}
A common mistake is assuming that an Image’s bounds start at (0, 0).
For example, an animated GIF contains a sequence of Images,
and each Image after the first typically only holds pixel data for the area that changed,
and that area doesn’t necessarily start at (0, 0).
The correct way to iterate over an Image m’s pixels looks like:
b := m.Bounds()
for y := b.Min.Y; y < b.Max.Y; y++ {
 for x := b.Min.X; x < b.Max.X; x++ {
  doStuffWith(m.At(x, y))
 }
}
Image implementations do not have to be based on an in-memory slice of pixel data.
For example, a Uniform is an
Image of enormous bounds and uniform color,
whose in-memory representation is simply that color.
type Uniform struct {
    C color.Color
}
Typically, though, programs will want an image based on a slice.
Struct types like RGBA and Gray
(which other packages refer to as image.RGBA and image.Gray) hold slices
of pixel data and implement the Image interface.
type RGBA struct {
    // Pix holds the image's pixels, in R, G, B, A order. The pixel at
    // (x, y) starts at Pix[(y-Rect.Min.Y)*Stride + (x-Rect.Min.X)*4].
    Pix []uint8
    // Stride is the Pix stride (in bytes) between vertically adjacent pixels.
    Stride int
    // Rect is the image's bounds.
    Rect Rectangle
}
These types also provide a Set(x, y int, c color.Color) method that allows modifying the image one pixel at a time.
m := image.NewRGBA(image.Rect(0, 0, 640, 480))
m.Set(5, 5, color.RGBA{255, 0, 0, 255})
If you’re reading or writing a lot of pixel data,
it can be more efficient, but more complicated,
to access these struct type’s Pix field directly.
The slice-based Image implementations also provide a SubImage method,
which returns an Image backed by the same array.
Modifying the pixels of a sub-image will affect the pixels of the original image,
analogous to how modifying the contents of a sub-slice s[i0:i1] will affect
the contents of the original slice s.

m0 := image.NewRGBA(image.Rect(0, 0, 8, 5))
m1 := m0.SubImage(image.Rect(1, 2, 5, 5)).(*image.RGBA)
fmt.Println(m0.Bounds().Dx(), m1.Bounds().Dx()) // prints 8, 4
fmt.Println(m0.Stride == m1.Stride)             // prints true
For low-level code that works on an image’s Pix field,
be aware that ranging over Pix can affect pixels outside an image’s bounds.
In the example above, the pixels covered by m1.Pix are shaded in blue.
Higher-level code, such as the At and Set methods or the image/draw package,
will clip their operations to the image’s bounds.
Image Formats
The standard package library supports a number of common image formats,
such as GIF, JPEG and PNG.
If you know the format of a source image file,
you can decode from an io.Reader directly.
import (
 "image/jpeg"
 "image/png"
 "io"
)

// convertJPEGToPNG converts from JPEG to PNG.
func convertJPEGToPNG(w io.Writer, r io.Reader) error {
 img, err := jpeg.Decode(r)
 if err != nil {
  return err
 }
 return png.Encode(w, img)
}
If you have image data of unknown format,
the image.Decode function can detect the format.
The set of recognized formats is constructed at run time and is not limited
to those in the standard package library.
An image format package typically registers its format in an init function,
and the main package will “underscore import” such a package solely for
the side effect of format registration.
import (
 "image"
 "image/png"
 "io"

 _ "code.google.com/p/vp8-go/webp"
 _ "image/jpeg"
)

// convertToPNG converts from any recognized format to PNG.
func convertToPNG(w io.Writer, r io.Reader) error {
 img, _, err := image.Decode(r)
 if err != nil {
  return err
 }
 return png.Encode(w, img)
}
Next article: The Go image/draw package
Previous article: The Laws of Reflection
Blog Index